
How to Lay Patio Stones: The Ultimate Guide for a Perfect Patio
Laying patio stones can transform your outdoor space, creating a beautiful and functional area for relaxation and entertainment. However, achieving a professional-looking result requires careful planning, the right materials, and a methodical approach. This comprehensive guide provides everything you need to know about how to lay patio stones, from initial design and preparation to the final finishing touches. We’ll cover essential techniques, common pitfalls to avoid, and expert tips to ensure your patio is not only aesthetically pleasing but also durable and long-lasting. Whether you’re a seasoned DIY enthusiast or a complete beginner, this guide will empower you to confidently tackle your patio project and create an outdoor oasis you’ll enjoy for years to come. Let’s explore how to lay patio stones the right way.
Understanding the Fundamentals of Laying Patio Stones
Laying patio stones isn’t just about placing stones on the ground. It’s about creating a stable, level, and visually appealing surface that can withstand the elements and foot traffic. The process involves several key steps, each crucial to the overall success of the project. We need to consider drainage, soil composition, base preparation, stone selection, and jointing techniques. Understanding these fundamentals is essential for achieving a professional-looking and long-lasting patio.
Defining Patio Stones and Their Variations
Patio stones, also known as paving stones or flagstones, are flat, durable materials used to create paved surfaces. They come in a wide variety of shapes, sizes, colors, and materials, each offering unique aesthetic and functional properties. Common materials include concrete, natural stone (such as sandstone, limestone, and granite), brick, and even recycled materials. Concrete pavers are manufactured in a wide range of styles and are a cost-effective option. Natural stone offers a more organic and unique look, but can be more expensive and require more specialized installation techniques. Brick pavers are another popular choice, offering a classic and timeless aesthetic. The selection of patio stones should align with the desired aesthetic, budget, and the intended use of the patio.
The Importance of Proper Preparation
The foundation of any successful patio project is proper preparation. This involves excavating the area, creating a stable base, and ensuring adequate drainage. A poorly prepared base can lead to settling, cracking, and uneven surfaces, compromising the integrity and appearance of the patio. Excavation removes topsoil and organic matter, which can decompose and cause instability. The base typically consists of compacted gravel, providing a solid and level surface for the patio stones. Proper drainage is essential to prevent water from accumulating under the patio, which can lead to frost heave in colder climates. Failing to adequately prepare the base is a common mistake that can result in costly repairs down the line.
Key Considerations for Drainage
Drainage is a critical aspect of patio construction that is often overlooked. Without proper drainage, water can accumulate under the patio stones, leading to a host of problems, including frost heave, erosion, and the growth of mold and mildew. The slope of the patio should be designed to allow water to run off easily. A general rule of thumb is to have a slope of at least 1/4 inch per foot. In areas with heavy rainfall, it may be necessary to install drainage systems, such as French drains or catch basins, to effectively manage water runoff. Consider the surrounding landscape and ensure that the patio drainage is integrated with the overall site drainage plan.
Selecting the Right Materials and Tools for Your Patio Project
Choosing the right materials and tools is crucial for a successful patio installation. The selection of patio stones, base materials, and tools will depend on the size and complexity of the project, as well as your personal preferences and budget. Investing in high-quality materials and tools will not only make the installation process easier but also ensure the longevity and durability of your patio.
Essential Materials for Laying Patio Stones
The primary materials required for laying patio stones include the patio stones themselves, base materials (such as gravel and sand), edging materials (such as concrete curbing or plastic edging), and jointing materials (such as polymeric sand or stone dust). The quantity of each material will depend on the size of the patio and the specific installation method. When selecting patio stones, consider factors such as material, size, shape, color, and texture. Base materials should be well-graded and compacted to provide a stable foundation. Edging materials help to contain the patio stones and prevent them from shifting over time. Jointing materials fill the gaps between the stones, providing stability and preventing weed growth.
Essential Tools for Patio Installation
The tools required for patio installation include a shovel, rake, tamper, level, measuring tape, saw (for cutting stones), rubber mallet, and safety glasses. A wheelbarrow is useful for transporting materials, and a plate compactor is recommended for compacting the base materials. A string line and stakes are helpful for establishing a level and straight line. A hand saw or circular saw with a masonry blade can be used to cut patio stones to fit around curves or obstacles. A rubber mallet is used to gently tap the stones into place without damaging them. Safety glasses are essential for protecting your eyes from dust and debris.
Choosing the Right Base Material: Gravel vs. Crushed Stone
The base material provides the foundation for your patio and plays a crucial role in drainage and stability. Two common options are gravel and crushed stone. Gravel consists of rounded particles, while crushed stone consists of angular particles. Crushed stone is generally preferred for patio bases because the angular particles interlock more tightly, providing a more stable and durable foundation. Gravel can be used, but it may require more compaction and may not be as resistant to settling over time. The size of the gravel or crushed stone is also important. A well-graded material, containing a mix of different particle sizes, will compact more effectively.
Step-by-Step Guide: How to Lay Patio Stones Like an Expert
Now that you have a solid understanding of the fundamentals and have gathered the necessary materials and tools, it’s time to start laying your patio stones. This step-by-step guide will walk you through the entire process, from excavation to finishing touches. Follow these instructions carefully to ensure a successful and professional-looking patio.
Step 1: Planning and Design
Before you start digging, take the time to plan and design your patio. Consider the size, shape, and layout of the patio, as well as the surrounding landscape. Sketch out your design on paper and mark the boundaries of the patio area. Consider the placement of furniture, walkways, and other features. It’s also important to check for underground utilities before you start excavating. Contact your local utility companies to locate any buried cables or pipes. This is a crucial safety precaution that should not be overlooked.
Step 2: Excavation and Base Preparation
Once you have a plan, it’s time to start excavating the area. Remove the topsoil and organic matter to a depth of at least 6-8 inches. The depth of excavation will depend on the type of base material you are using and the local climate. In colder climates, you may need to excavate deeper to prevent frost heave. After excavation, compact the soil with a tamper or plate compactor. Then, add a layer of gravel or crushed stone to a depth of 4-6 inches. Compact the base material in layers, using a plate compactor for best results. Ensure that the base is level and sloped slightly for drainage.
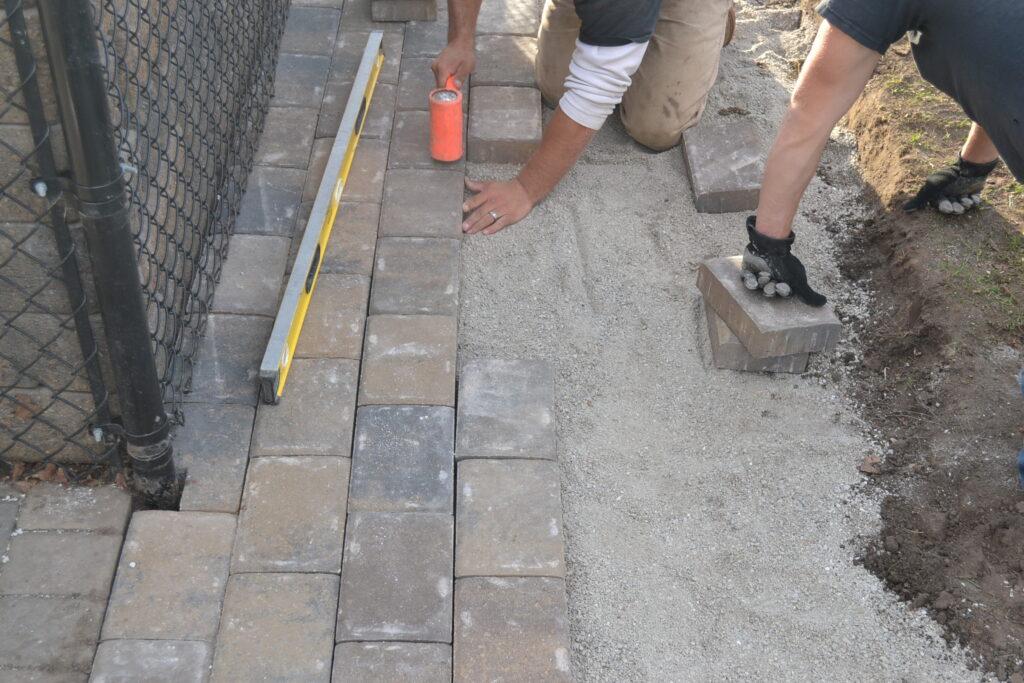
Step 3: Laying the Patio Stones
With the base prepared, you can now start laying the patio stones. Begin by laying the stones along the perimeter of the patio area, using the edging materials to contain the stones. Then, fill in the center of the patio, working in a systematic pattern. Use a level to ensure that each stone is level with its neighbors. If a stone is too high or too low, adjust the base material underneath it. Use a rubber mallet to gently tap the stones into place. Leave a small gap between the stones for jointing material. A gap of about 1/4 to 1/2 inch is typically recommended.
Step 4: Jointing and Finishing
Once all of the patio stones are in place, it’s time to fill the joints with jointing material. Polymeric sand is a popular choice because it hardens over time, preventing weed growth and erosion. Stone dust is another option, but it may require more maintenance. Sweep the jointing material into the gaps between the stones, using a broom or brush. Compact the jointing material with a tamper or plate compactor. Water the patio to help the jointing material settle. Repeat the process as necessary until the joints are completely filled. Finally, sweep the patio clean and enjoy your new outdoor space.
Maintaining Your Patio: Ensuring Longevity and Beauty
Proper maintenance is essential for ensuring the longevity and beauty of your patio. Regular cleaning and occasional repairs will help to keep your patio looking its best for years to come. Neglecting maintenance can lead to the growth of weeds, the accumulation of dirt and debris, and the deterioration of the patio stones.
Regular Cleaning and Weed Control
Clean your patio regularly with a broom or hose to remove dirt and debris. For stubborn stains, use a mild detergent and a scrub brush. Avoid using harsh chemicals or abrasive cleaners, as they can damage the patio stones. Control weeds by pulling them out by hand or using a weed killer. Apply a pre-emergent herbicide in the spring to prevent weeds from growing. Consider using polymeric sand in the joints to inhibit weed growth.
Repairing Cracks and Settling
Inspect your patio regularly for cracks and settling. Cracks can be repaired with a concrete patching compound or mortar. Settling can be corrected by lifting the affected stones and adding more base material underneath. If the settling is severe, it may be necessary to re-lay the entire patio. Addressing cracks and settling promptly will prevent further damage and maintain the integrity of the patio.
Sealing and Protecting Your Patio Stones
Sealing your patio stones can help to protect them from stains, water damage, and the effects of weathering. Apply a sealant specifically designed for patio stones, following the manufacturer’s instructions. Sealing is especially important for natural stone patios, as they are more porous and susceptible to staining. Reapply the sealant every few years to maintain its effectiveness. Consider the type of sealant based on your climate, some are better suited for areas with high moisture, while others are better for areas with extreme temperature variations.
Expert Tips and Tricks for Laying Patio Stones
Here are some expert tips and tricks to help you achieve a professional-looking patio:
* **Use a string line and stakes to establish a level and straight line.** This will ensure that your patio is level and even.
* **Compact the base material in layers.** This will provide a more stable and durable foundation.
* **Use a rubber mallet to gently tap the stones into place.** This will prevent damage to the stones.
* **Leave a small gap between the stones for jointing material.** This will allow for expansion and contraction and prevent cracking.
* **Use polymeric sand to fill the joints.** This will prevent weed growth and erosion.
* **Slope the patio slightly for drainage.** This will prevent water from accumulating under the patio.
* **Seal the patio stones to protect them from stains and water damage.** This will help to keep your patio looking its best for years to come.
Advantages, Benefits & Real-World Value of a Patio
A well-laid patio provides numerous advantages and benefits, enhancing your outdoor living experience and increasing the value of your property. From creating a relaxing outdoor space to improving your home’s curb appeal, a patio offers a multitude of real-world benefits.
* **Enhanced Outdoor Living:** A patio extends your living space outdoors, providing a comfortable and inviting area for relaxation, dining, and entertaining. Imagine enjoying a summer evening with friends and family on your beautifully paved patio.
* **Increased Property Value:** A well-designed and well-maintained patio can significantly increase the value of your property. It adds curb appeal and creates a desirable outdoor feature for potential buyers.
* **Improved Curb Appeal:** A patio can dramatically improve the curb appeal of your home. It creates a welcoming and attractive outdoor space that enhances the overall aesthetic of your property.
* **Low Maintenance:** Compared to a lawn, a patio requires relatively little maintenance. Regular cleaning and occasional repairs are all that’s needed to keep it looking its best.
* **Versatile Space:** A patio can be used for a variety of purposes, from outdoor dining and entertaining to relaxing and enjoying the scenery. It’s a versatile space that can be adapted to your specific needs and preferences.
Patio Stones Review: An Expert’s Assessment
As an expert in landscape design and construction, I’ve had extensive experience working with various types of patio stones. In my opinion, concrete pavers offer the best balance of affordability, durability, and aesthetics. They are available in a wide range of styles and colors, making it easy to find a paver that complements your home’s architecture. However, natural stone pavers offer a more unique and organic look, but they can be more expensive and require more specialized installation techniques. Brick pavers are a classic and timeless choice, but they may not be as durable as concrete or natural stone. Ultimately, the best type of patio stone for you will depend on your personal preferences, budget, and the intended use of the patio.
Pros of Concrete Pavers
* **Affordability:** Concrete pavers are generally less expensive than natural stone pavers.
* **Durability:** Concrete pavers are highly durable and can withstand the elements and foot traffic.
* **Versatility:** Concrete pavers are available in a wide range of styles and colors.
* **Ease of Installation:** Concrete pavers are relatively easy to install.
* **Low Maintenance:** Concrete pavers require little maintenance.
Cons of Concrete Pavers
* **Less Natural Look:** Concrete pavers may not have the same natural look as natural stone pavers.
* **Can Fade Over Time:** Concrete pavers can fade over time due to exposure to the sun.
* **May Require Sealing:** Concrete pavers may require sealing to protect them from stains and water damage.
* **Susceptible to Cracking:** Can crack in areas with extreme temperature fluctuations if not properly installed.
Ideal User Profile
Concrete pavers are ideal for homeowners who are looking for an affordable, durable, and versatile patio option. They are also a good choice for DIYers, as they are relatively easy to install. Homeowners who prioritize a natural look may prefer natural stone pavers, but they should be prepared to pay more and potentially hire a professional installer.
Key Alternatives
* **Natural Stone Pavers:** Natural stone pavers offer a more unique and organic look, but they are more expensive and require more specialized installation techniques.
* **Brick Pavers:** Brick pavers are a classic and timeless choice, but they may not be as durable as concrete or natural stone.
Expert Overall Verdict & Recommendation
Overall, I highly recommend concrete pavers for most patio projects. They offer the best balance of affordability, durability, versatility, and ease of installation. However, homeowners who prioritize a natural look may prefer natural stone pavers, but they should be prepared to pay more and potentially hire a professional installer. Proper preparation and installation are essential for ensuring the longevity and beauty of your patio, regardless of the type of paver you choose.
Q&A: Expert Answers to Your Patio Stone Questions
Here are some frequently asked questions about laying patio stones:
**Q1: What’s the most common mistake people make when laying patio stones?**
A: One of the most common mistakes is neglecting proper base preparation. A poorly prepared base can lead to settling, cracking, and uneven surfaces, compromising the integrity and appearance of the patio. Ensure adequate compaction and drainage.
**Q2: How do I prevent weeds from growing between my patio stones?**
A: Use polymeric sand in the joints between the stones. Polymeric sand hardens over time, preventing weed growth and erosion. Apply a pre-emergent herbicide in the spring to further inhibit weed growth.
**Q3: What’s the best way to cut patio stones to fit around curves or obstacles?**
A: Use a hand saw or circular saw with a masonry blade. Score the stone first to create a clean cut and prevent chipping. Wear safety glasses to protect your eyes from dust and debris.
**Q4: How do I ensure that my patio is level?**
A: Use a string line and stakes to establish a level line. Use a level to check the level of each stone as you lay it. Adjust the base material underneath the stone as needed to achieve a level surface.
**Q5: How do I choose the right type of patio stone for my project?**
A: Consider factors such as material, size, shape, color, and texture. Concrete pavers offer the best balance of affordability, durability, and aesthetics. Natural stone pavers offer a more unique and organic look, but they can be more expensive.
**Q6: Is it necessary to seal patio stones?**
A: Sealing patio stones can help to protect them from stains, water damage, and the effects of weathering. Sealing is especially important for natural stone patios, as they are more porous and susceptible to staining. Reapply the sealant every few years to maintain its effectiveness.
**Q7: How much slope should I have on my patio for drainage?**
A: A general rule of thumb is to have a slope of at least 1/4 inch per foot. This will allow water to run off easily and prevent it from accumulating under the patio.
**Q8: What is the ideal thickness for patio stones?**
A: For patios designed for pedestrian traffic, a thickness of 1 1/2 to 2 inches is generally sufficient. For patios designed to support heavier loads, such as vehicles, a thickness of 2 1/2 to 3 inches is recommended.
**Q9: How do I deal with ants nesting under my patio stones?**
A: Apply an insecticide specifically designed for ant control around the perimeter of the patio and in the joints between the stones. You can also try using diatomaceous earth, a natural insecticide that is safe for humans and pets.
**Q10: What are the signs that my patio base is failing?**
A: Signs of a failing patio base include settling, cracking, and uneven surfaces. If you notice these problems, it may be necessary to re-lay the patio with a properly prepared base.
Conclusion: Creating Your Dream Patio with Expert Knowledge
Laying patio stones is a rewarding project that can transform your outdoor space into a beautiful and functional area. By following the steps outlined in this comprehensive guide, you can confidently tackle your patio project and create an outdoor oasis you’ll enjoy for years to come. Remember to prioritize proper planning, preparation, and maintenance to ensure the longevity and beauty of your patio. With the right knowledge and tools, you can achieve professional-looking results and create a patio that enhances your outdoor living experience and increases the value of your property. Now that you know how to lay patio stones, what are you waiting for? Start planning your dream patio today!
Consider sharing your patio-laying experiences in the comments below. If you’re interested in more advanced landscaping techniques, explore our guide to designing sustainable gardens. For personalized assistance, contact our team of experts for a consultation on how to lay patio stones and create the perfect outdoor space for your home.
